Podcast listenership has been steadily increasing in recent years, and some are even predicting that we’re on the verge of a podcasting explosion. With that being said, it’s pretty likely you’ll get tasked with creating an iTunes podcast feed. Luckily, it’s quite simple to create one on your Drupal site with Views.
Required modules
- Views
- Views RSS
- Views RSS: iTunes Elements
- Libraries (dependency for getID3())
- getID3() (dependency for Views RSS: iTunes Elements)
Create/Modify content type for feed
-
Install and enable the required modules.
drush en views views_ui views_rss views_rss_core views_rss_itunes libraries getid3 -y- Create a new folder in your libraries folder like so:
sites/all/libraries/getid3. - Go to http://www.getid3.org/ and download the appropriate version based on your web server’s PHP version.
- Make sure
write.phpis insites/all/libraries/getid3/getid3.
- Create a new folder in your libraries folder like so:
-
Your content type should have fields that can be mapped to the recommended iTunes RSS tags. Apple kindly provided a very helpful graphic for this.
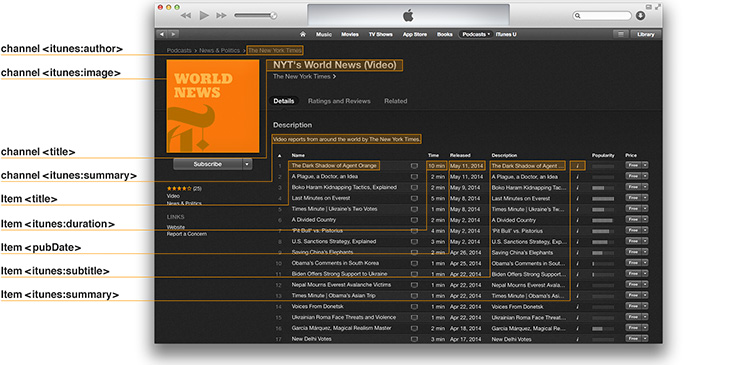
Not all the tags are required. But it's good practice to include the following (as shown in the image above) so your podcast shows up nicely on the iTunes store:
- channel <itunes:author>
- channel <itunes:image>
- channel <title>
- channel <itunes:summary>
- item <title>
- item <itunes:duration>
- item <pubDate>
- item <itunes:subtitle>
- item <itunes:summary>
-
Create a content type with at least the following fields:
- Title
- Description (just repurpose the Body field)
- Image
- Audio - Use the File field
If you already have a content type that has an audio file field, you can skip this. Otherwise, when creating the new file field, make sure you change the allowed file extensions accordingly. iTunes accepts m4a, mp3, mov, mp4, m4v, pdf, epub.

Create the Feed view
For this example, I’ll be recreating the sample feed from the Making a Podcast guide by Apple.
-
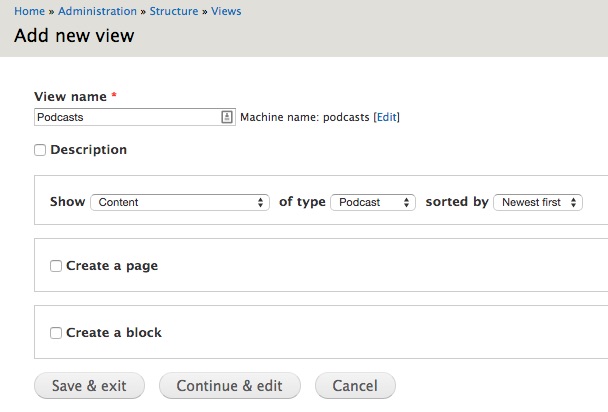
Create a new view for your content type.
-
Add a feed view display. Specify the file name of your feed file,
podcast.rssis a good option.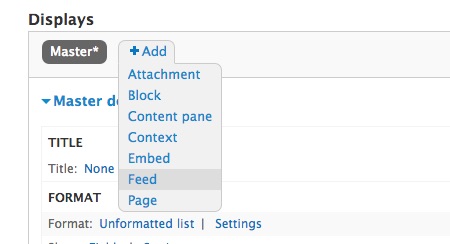
-
Under Format, select RSS Feed - Fields as the format. The Views add-on for iTunes elements provides fields for all the available tags, and you can decide which ones you want to use. The module also helpfully points out which ones are required by Apple. For now, just click Apply on the Settings interface because we need to add the necessary fields first.
-
There are quite a number of fields to add and I’ll go through each one as some of them need tweaking to ensure the feed will validate properly. For all the fields, uncheck Create a label.
- Content: Title maps to item <title> This field is present by default. Ensure that Link this field to the original piece of content is unchecked. a tags are not allowed in the title field.
- Content: Body maps to <itunes:subtitle> and <itunes:summary> Add the Content: Body field and set the format to trimmed. Adjust the trim length as required. Under Rewrite results, ensure Strip HTML tags is checked. HTML tags are not allowed in the <itunes:subtitle> or <itunes:summary> fields.
- Content: Path maps to item <link> Add the Content: Path field and under Rewrite results, ensure Use absolute link (begins with “http://”) is checked. The link field must contain full URLs.
- Content: Post date maps to item <pubDate>
Before you add the field, you need to add a RFC-822 date format to your site. Go to
/admin/config/regional/date-time/formatsand adding the Format string: D, d M Y H:i:s O. Then, go to/admin/config/regional/date-timeand add a date type using this new format. Add the Content: Post date field and set the Date format to the RFC 822 format you just created. The pubDate field must be in the RFC 822 format.
The next three fields are duplicates, just formatted differently.
- Content: Audio maps to item <enclosure> Add the Content: Audio field and set the Formatter to RSS <enclosure> element. I strongly suggest changing the Administrative title (under More) to something like Content: Audio (enclosure) for easier identification.
- Content: Audio maps to item <itunes:duration> Add another Content: Audio field and set the Formatter to RSS <itunes:duration> element. Change the Administrative title (under More) to something like Content: Audio (duration) for easier identification.
- Content: Audio maps to item <guid> Add another Content: Audio field and set the Formatter to URL to file. Change the Administrative title (under More) to something like Content: Audio (guid) for easier identification.
-
Under Format, click on Settings. This is where you map your fields to their respective tags.
- For Channel elements: core, fill in the following fields:
- description -> description of the entire podcast
- language -> language code for the channel
- category -> multiple categories allowed
- For Channel elements: itunes, fill in the following fields:
- subtitle -> subtitle for the entire podcast
- summary -> brief summary for the entire podcast
- category -> multi-select field of iTunes categories
- image -> enter a URL for the image
- explicit -> select either yes, no or clean
- owner -> format is: john.smith@example.com, John Smith
- For Item elements: core, map the following fields:
- title -> Content: Title
- link -> Content: Path
- description -> Content: Body
- enclosure -> Content: Audio (enclosure)
- guid -> Content: Audio (guid)
- pubDate -> Content: Post date
- For Item elements: itunes, map the following fields:
- subtitle -> Content: Body
- summary -> Content: Body
- duration -> Content: Audio (duration)
- For Channel elements: core, fill in the following fields:
-
If you scroll down to the Preview panel, you should see a nice XML file ready to be sent over to iTunes. But before that, we need to make sure our feed passes validation.
Testing your feed file
- There are a couple ways you can do this. I exported my podcast.rss file and hosted it on my GitHub account, but you can host it anywhere you want. If you have a staging site to deploy to for testing, even better. Go to Cast Feed Validator and enter the URL to your feed file.
- If all goes well, you should see something like this:
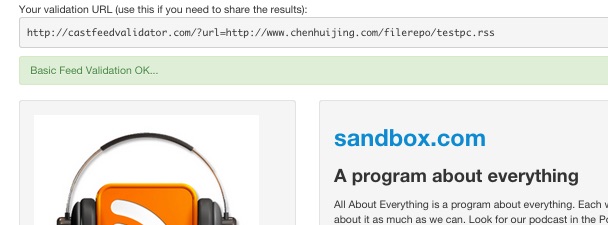
- Note that if you exported your podcast.rss file from local development, and your site domain isn’t a legit domain (I use .dev on my local), your feed will not validate. But this can be ignored because once you deploy to an actual site, this issue will be resolved.
If you run into AJAX errors…
I’m not too sure if this is a localised issue or not, so I’m just adding on what I did to resolve the AJAX issues I encountered.
- Downgrade the getid3 module to version 7.x-1.0
- Double-check that Drupal recognises the getid3 library by checking Status Report
- Make sure the getid3 library path matches the actual folder name in your Libraries folder
Wrap-up
And that’s pretty much it. Your feed should be ready for submission to the iTunes store. I suggest using the Making a Podcast documentation as a checklist just to ensure everything is in order. Happy podcasting!