This series of tutorials will explore the Vonage Video API (formerly TokBox OpenTok) and what you can build with it. The Video API is very robust and highly customizable, and in each post, we’ll show how to implement a specific feature using the API. This time we will look at how to add screen-sharing to your basic audio-video chat.
As this application will require some server-side code, we will use Glitch for ease of setup. You can also download the code from this Glitch project and deploy it on your server or hosting platform of choice (may probably require some configuration tweaking based on the requirements of your platform).
We will not be using any front-end frameworks for this series, just vanilla Javascript, to keep the focus on the Video API itself. At the end of this tutorial, you should be able to share your screen with the person in your video chat.
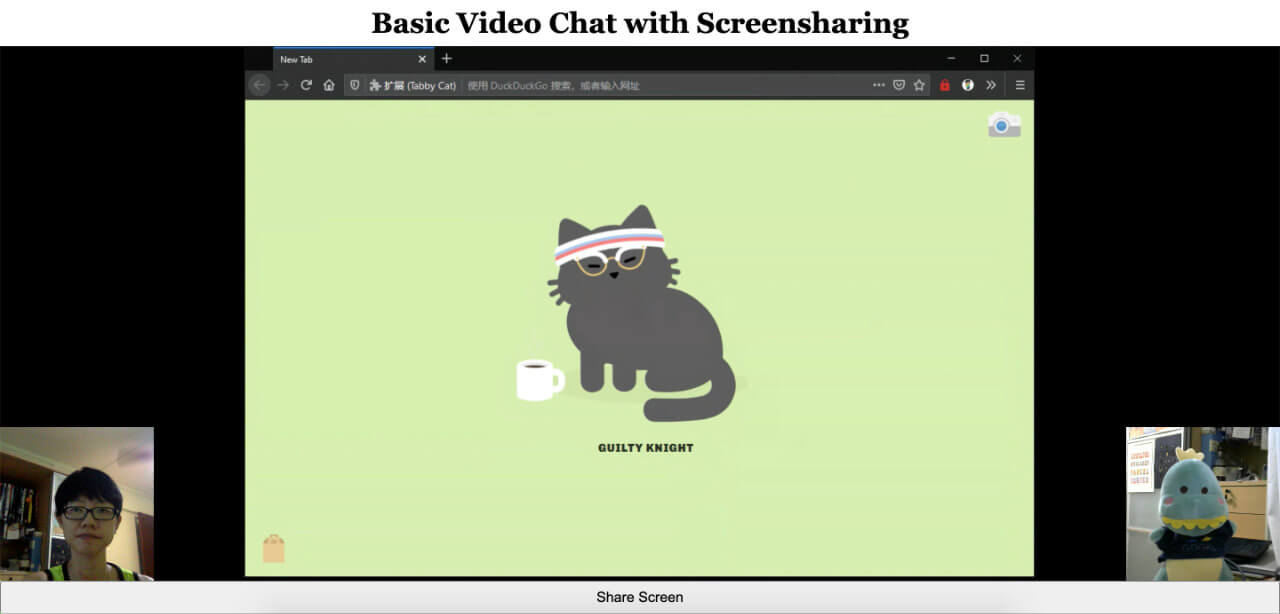
The final code for this application can be found in this GitHub repository or remixed on Glitch.
Prerequisites
Before we get started, you will need a Vonage Video API account, which you can create for free here. You will also need Node.js installed (if you are not using Glitch).
This tutorial builds on the first introductory post in the series: Building a Basic Video Chat. If this is your first time using the Video API, we highly suggest you go through that because it covers the following basic setup:
- Create a Vonage Video API project
- Setting up on Glitch
- Basic project structure
- Initializing a session
- Connecting to the session, subscribing and publishing
- Basic layout styles for a video chat
Prepare for Multiple Published Streams
In the previous application, your browser connected to the session and published a single stream (your camera). However, with the addition of your screen sharing, you may be publishing two streams in the same session. In public/client.js, move the session into a global variable.
Before:
function initializeSession(apiKey, sessionId, token) {
  const session = OT.initSession(apiKey, sessionId);
  // more code below
}
After:
let session;

function initializeSession(apiKey, sessionId, token) {
  session = OT.initSession(apiKey, sessionId);
  // more code below
}
In views/index.html, you must provide a placeholder element for the screen sharing video to be displayed, and a button to trigger the sharing. Also create a button to stop screen sharing, which will be used later:
<main>
  <!-- This element is new -->
  <div id="screen" class="screen"></div>

  <!-- These two elements already exist from the first tutorial -->
  <div id="subscriber" class="subscriber"></div>
  <div id="publisher" class="publisher"></div>

  <!-- These are both new too -->
  <button id="startScreenShare" class="screen-share">Share Screen</button>
  <button id="stopScreenShare" class="screen-share hidden">Stop Sharing Screen</button>
</main>
Check Screen Sharing Capabilities
When the share button is pressed, the application should first check that it can share the screen. Add this code to the bottom of client.js:
const startShareBtn = document.getElementById("startScreenShare");

startShareBtn.addEventListener("click", event => {
  OT.checkScreenSharingCapability(response => {
    if (!response.supported || response.extensionRegistered === false) {
      alert("Screen sharing not supported");
    } else if (response.extensionInstalled === false) {
      alert("Browser requires extension");
    } else {
      // Share screen code
    }
  });
});
The OT.checkScreenSharingCapability() method returns information about the current browser’s capabilities. Based on this, you can determine whether the browser doesn’t support it, requires an extension in older browsers, or can share using native APIs.
In Chrome 71 and earlier, Firefox 51 and earlier, and Opera 58 and earlier, the user will need to install an extension to share their screen. This post doesn’t cover extensions, but you can find out more in the documentation.
Share Your Screen
Add the following code in the else statement block above:
const screenSharePublisher = OT.initPublisher(
  "screen",
  {
    insertMode: "append",
    width: "100%",
    height: "100%",
    videoSource: "screen",
    publishAudio: true
  },
  handleCallback
);
session.publish(screenSharePublisher, handleCallback);
The first parameter is the id of the HTML element, which the publisher video will populate. Sharing a screen is much like sharing a camera for modern browsers. By adding videoSource: "screen" to your publisher options, the browser will request the correct permissions on your behalf. publishAudio is optional.
Once you’ve created the new publisher, you can publish it to our session.
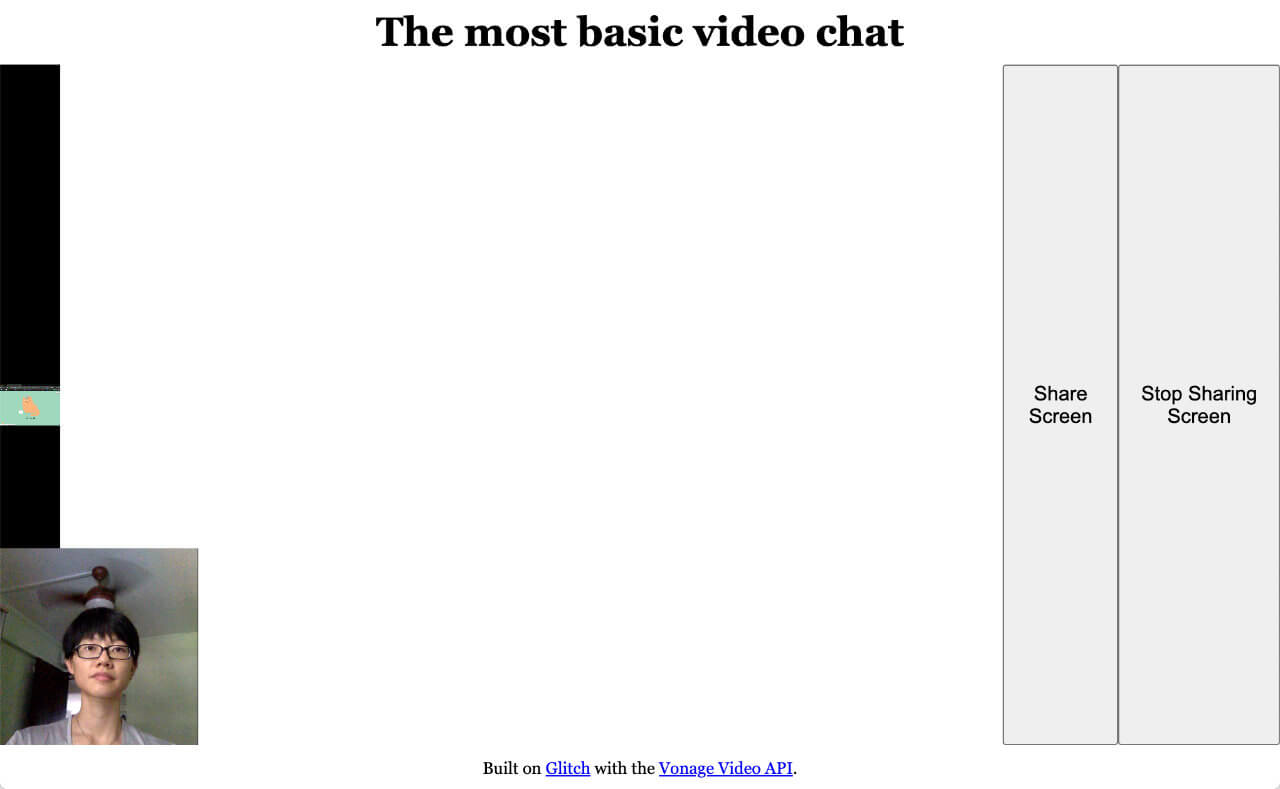
It works, but as you may have noticed, the screen sharing video is pushed up against the side of the window, and the buttons are in an odd place. Add the following to your public/style.css file:
.screen {
  width: 100%;
  height: 100%;
  display: flex;
}

.screen-share {
  position: absolute;
  bottom: 0;
  right: 0;
}

.hidden {
  display: none;
}
Stop Sharing Your Screen
To stop sharing a published stream, you need access to the variable it is assigned to. Above the event listener, create an empty screenSharePublisher variable:
let screenSharePublisher;
In the event listener, assign OT.initPublisher(...) to the new variable by removing the const keyword.
At the bottom of client.js add an event listener for the stop sharing button:
const stopShareBtn = document.getElementById("stopScreenShare");

stopShareBtn.addEventListener("click", event => {
  screenSharePublisher.destroy();
});
Fix the Remaining Layout Issues
By now, your application would look something like this:
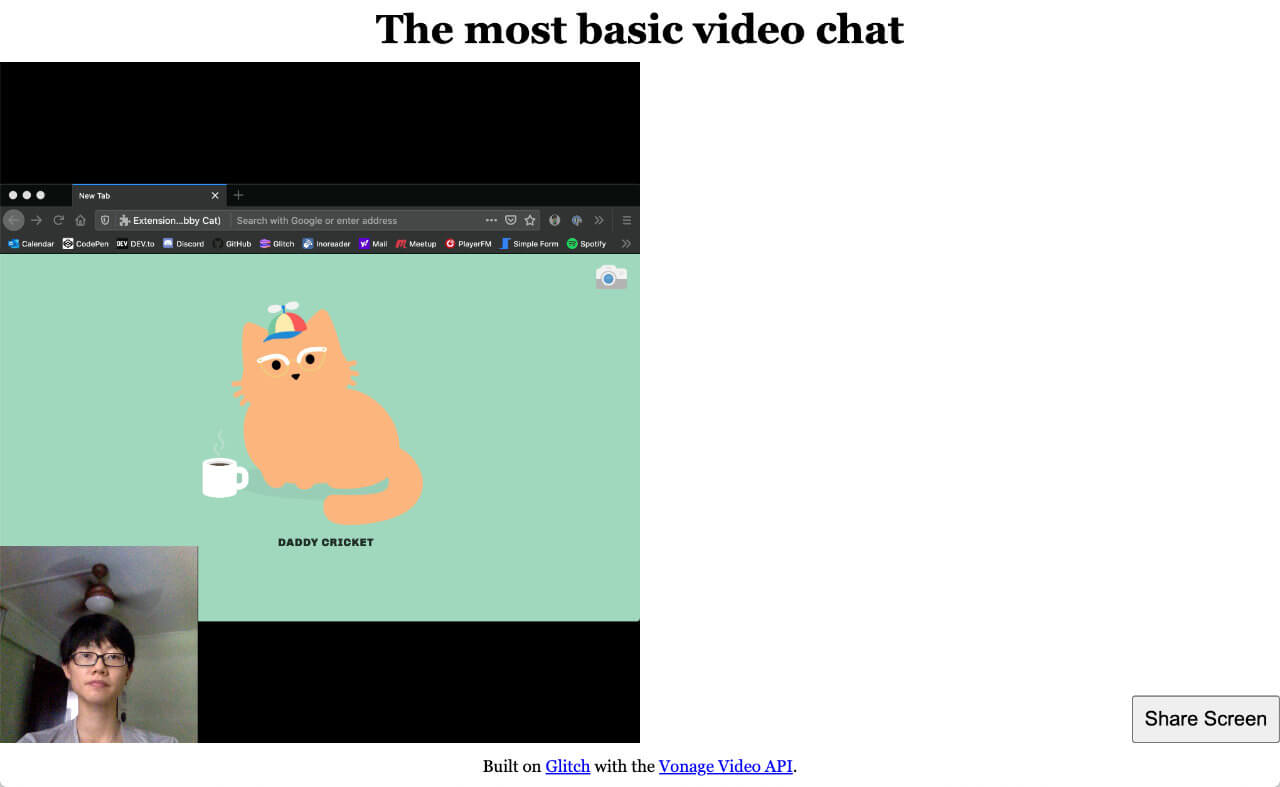
It’s slightly better than the start but still looks broken. Let’s fix that up with some CSS and Javascript (to toggle the required CSS classes).
Let’s remove the original .screen styles from style.css:
/* We don't need these any more */
.screen {
  width: 100%;
  height: 100%;
  display: flex;
}
Modify the .subscriber class styles in the style.css as follows:
.subscriber,
.screen.pub-active,
.screen.sub-active {
  width: 100%;
  height: 100%;
  display: flex;
}

.screen.sub-active ~ .subscriber,
.screen.pub-active ~ .subscriber {
  position: absolute;
  width: 25vmin;
  height: 25vmin;
  min-width: 8em;
  min-height: 8em;
  align-self: flex-end;
  right: 0;
}
What we’re doing here is making the element which houses the screen sharing stream take up the full real-estate of the viewport when active, while making the stream for the camera feed tuck into the bottom-right corner of the viewport.
Next, we will need to make sure the correct classes are added to the appropriate elements when the screen-sharing starts:
screenSharePublisher = OT.initPublisher(
  "screen",
  {
    insertMode: "append",
    width: "100%",
    height: "100%",
    videoSource: "screen",
    publishAudio: true
  },
  handleCallback
);
session.publish(screenSharePublisher, handleCallback);

// CSS classes when screen-sharing starts
startShareBtn.classList.toggle("hidden");
stopShareBtn.classList.toggle("hidden");
document.getElementById("screen").classList.add("pub-active");
The converse needs to happen when screen-sharing stops:
stopShareBtn.addEventListener("click", event => {
  screenSharePublisher.destroy();

  // CSS classes when screen-sharing stops
  startShareBtn.classList.toggle("hidden");
  stopShareBtn.classList.toggle("hidden");
  document.getElementById("screen").classList.remove("pub-active");
});
Now things look all right when you start the screen share. But for the person on the opposite end of the call, the layout is still sort of broken.
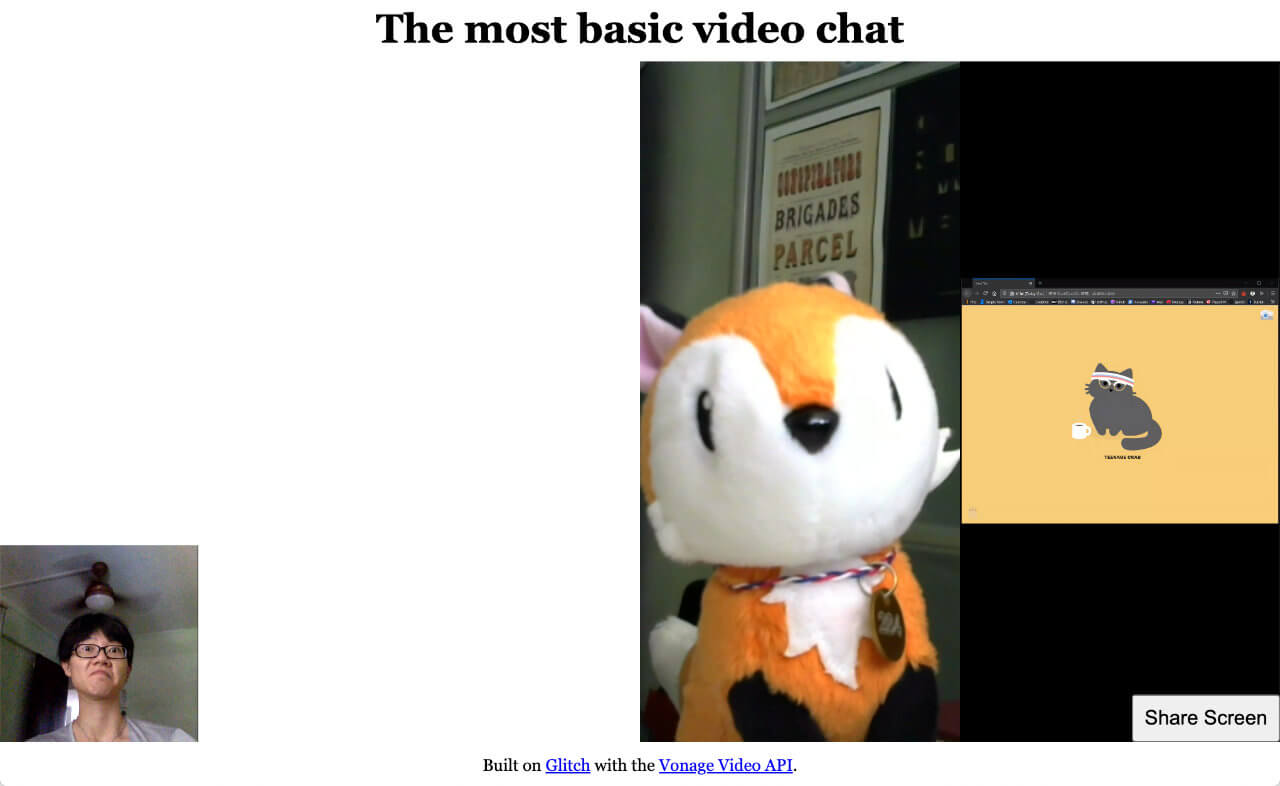
To fix that, let’s modify the streamCreated event listener that subscribes to any newly created streams. We will check if the stream created is a camera stream or a screen share stream. If it’s a screen share, we will add the sub-active CSS class to it.
Before:
session.connect(token, error => {
  // Other code not included for brevity

  // Subscribe to a newly created stream
  session.on("streamCreated", event => {
    session.subscribe(
      event.stream,
      "subscriber",
      {
        insertMode: "append",
        width: "100%",
        height: "100%"
      },
      handleCallback
    );
  });
});
After:
// Subscribe to a newly created stream
session.on("streamCreated", event => {
  const streamContainer =
    event.stream.videoType === "screen" ? "screen" : "subscriber";
  session.subscribe(
    event.stream,
    streamContainer,
    {
      insertMode: "append",
      width: "100%",
      height: "100%"
    },
    handleScreenShare(event.stream.videoType)
  );
});

// Function to handle screenshare layout
function handleScreenShare(streamType, error) {
  if (error) {
    console.log("error: " + error.message);
  } else {
    if (streamType === "screen") {
      document.getElementById("screen").classList.add("sub-active");
    }
  }
}
And we’ll need to add an event listener for when the screenshare is stopped as well:
session.on("streamDestroyed", event => {
  document.getElementById("screen").classList.remove("sub-active");
});
You should end up with something like this for the person on the receiving end of the screen share:
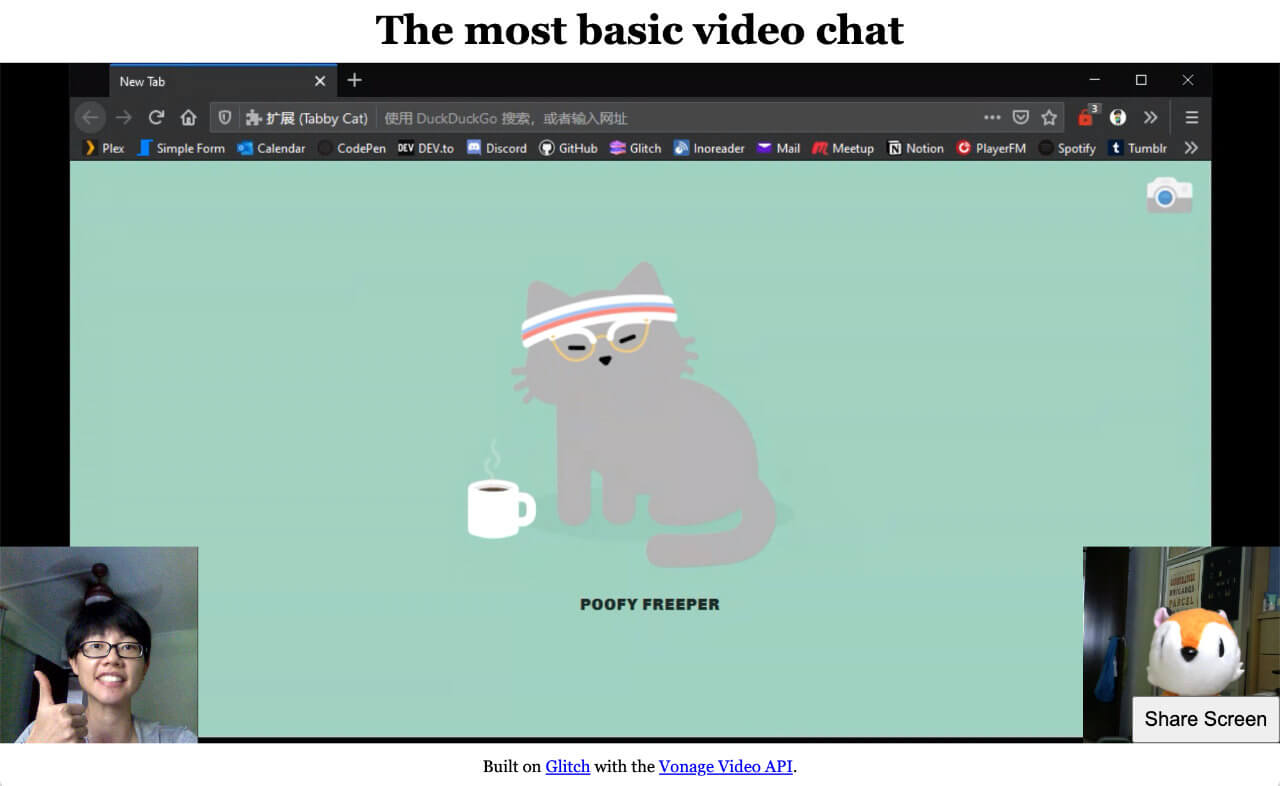
After all that, your client.js file would look like this:
let session;

fetch(location.pathname, { method: "POST" })
  .then(res => {
    return res.json();
  })
  .then(res => {
    const apiKey = res.apiKey;
    const sessionId = res.sessionId;
    const token = res.token;
    initializeSession(apiKey, sessionId, token);
  })
  .catch(handleCallback);

function initializeSession(apiKey, sessionId, token) {
  // Create a session object with the sessionId
  session = OT.initSession(apiKey, sessionId);

  // Create a publisher
  const publisher = OT.initPublisher(
    "publisher",
    {
      insertMode: "append",
      width: "100%",
      height: "100%"
    },
    handleCallback
  );

  // Connect to the session
  session.connect(token, error => {
    // If the connection is successful, initialize the publisher and publish to the session
    if (error) {
      handleCallback(error);
    } else {
      session.publish(publisher, handleCallback);
    }
  });

  // Subscribe to a newly created stream
  session.on("streamCreated", event => {
    const streamContainer =
      event.stream.videoType === "screen" ? "screen" : "subscriber";
    session.subscribe(
      event.stream,
      streamContainer,
      {
        insertMode: "append",
        width: "100%",
        height: "100%"
      },
      handleScreenShare(event.stream.videoType)
    );
  });

  session.on("streamDestroyed", event => {
    document.getElementById("screen").classList.remove("sub-active");
  });
}

// Function to handle screenshare layout
function handleScreenShare(streamType, error) {
  if (error) {
    console.log("error: " + error.message);
  } else {
    if (streamType === "screen") {
      document.getElementById("screen").classList.add("sub-active");
    }
  }
}

// Callback handler
function handleCallback(error) {
  if (error) {
    console.log("error: " + error.message);
  } else {
    console.log("callback success");
  }
}

let screenSharePublisher;
const startShareBtn = document.getElementById("startScreenShare");

startShareBtn.addEventListener("click", event => {
  OT.checkScreenSharingCapability(response => {
    if (!response.supported || response.extensionRegistered === false) {
      alert("Screen sharing not supported");
    } else if (response.extensionInstalled === false) {
      alert("Browser requires extension");
    } else {
      screenSharePublisher = OT.initPublisher(
        "screen",
        {
          insertMode: "append",
          width: "100%",
          height: "100%",
          videoSource: "screen",
          publishAudio: true
        },
        handleCallback
      );
      session.publish(screenSharePublisher, handleCallback);

      startShareBtn.classList.toggle("hidden");
      stopShareBtn.classList.toggle("hidden");
      document.getElementById("screen").classList.add("pub-active");
    }
  });
});

const stopShareBtn = document.getElementById("stopScreenShare");

stopShareBtn.addEventListener("click", event => {
  screenSharePublisher.destroy();
  startShareBtn.classList.toggle("hidden");
  stopShareBtn.classList.toggle("hidden");
  document.getElementById("screen").classList.remove("pub-active");
});
What’s Next?
The final code on Glitch and GitHub contains everything we covered in this fairly lengthy post but re-organized, so the code is cleaner and more maintainable. Feel free to remix or clone the code and play around with it yourself.
There are additional functionalities we can build with the Vonage Video API, which will be covered in future tutorials, but in the meantime, you can find out more at our comprehensive documentation site. If you run into any issues or have questions, reach out to us on our Community Slack. Thanks for reading!