Feeds is a very useful module when it comes to importing content into your Drupal site. However, it’s not very forgiving, in that your data has to be formatted just right for the feed to take.
This post will run through the basic feed importers and some key points I learnt from hours upon hours of troubleshooting. I’m pretty sure I’ve spent upwards of 50 hours dealing with feeds thus far in my life.
Before I begin, I have a short rant on the importance of content. You could skip directly to the bits on feeds but then, it’ll be less entertaining.
The heart of every website is its content. At least, most of the time. And as much as I love cupcake ipsum, there’s no substitute for actual content. At some point in time during the process of building a website, there will be a task known as content population.
If your content is still floating around in your headspace (or most likely, your client’s headspace), STOP what you’re doing.
Shut it down.
Now.
As someone who’s experienced the consequences of this first-hand, my takeaway is to avoid designing and building, especially building, a website until you have a good grasp of what the content will be. Even then, it’s safer if you actually have the content in some form, even if it’s a Word doc or a PDF file.
I’ve listened to every single episode of the seanwes podcast, so I can attest to the tangible benefits of listening to this podcast. I highly suggest episode 13, aptly titled You Design The Content. Here’s a golden quote from the episode:
You cannot design without content. You design the content. You don’t design websites. You design the content. Lines, boxes, colours, texture et cetera are all elements. They are tools with which you design. They are not design themselves. You cannot design without content, therefore it must be a requirement up front. You must have all the content at the start of the project.
There’s plenty more good stuff where that came from, so follow Sean McCabe, subscribe to his podcast, sign up for the community, watch his daily videos. Just loads of valuable material.
Assuming you’ve got your hands on all that content, it still has to get onto the site you’re building. Now, there are many ways you can do this. You could get someone to manually create each piece of content on the site. If you only have a handful of pages, this isn’t a bad option. If you have hundreds of pages of content in almost as many fields, asking someone to do this manually could get you criminally charged for torture.
In all seriousness, one of the most commonly used methods to import large amounts of content is with the Feeds module. The official documentation for Feeds is very good and comprehensive, but I still ran into some issues when I tried it for the first time (and subsequent times as well, to be honest).
I attribute it to the complicated data sets I had to work with. Usually, for single value fields, the data import is pretty straight-forward. It’s when you have to deal with multi-value fields when things start to get messy.
Sometimes you’ll find that the trickiest part of getting your feed to import successfully is mostly about massaging the data so it gets read correctly. I describe one of my data cleansing adventures here.
There are many different types of parsers you can use to build your feed importer. The most commonly used methods are:
CSV import
If you’re doing a CSV import with multi-value fields, it really pays to be well-versed in the fine art of Excel-fu. That also means you should have access to Microsoft Excel, because personally, I have yet to find a spreadsheet software that can match the functionalities of Excel.
-
Add your new importer and set up the basic settings as required.
-
Set up your fetcher settings. All my CSV importer use cases thus far were from a file so I’ve always chosen File upload. There appears to be an expert option for this, but I’ve never had to invoke it so I’ll let you know if I ever do.
-
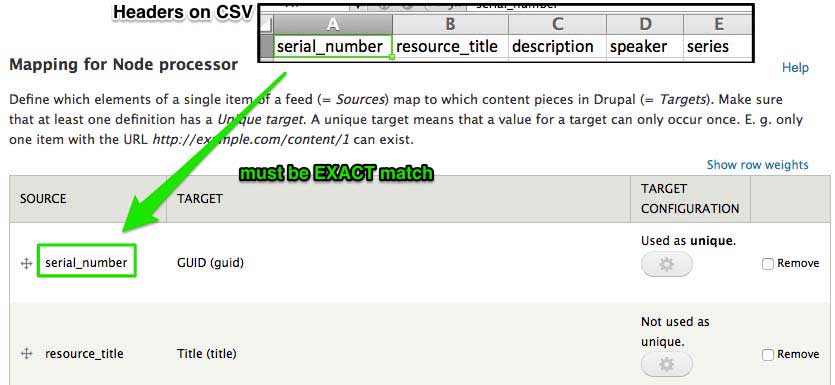
Set the parser to CSV parser. You have a few options for choice of delimiter: comma, semi-colon, tab, pipe and plus. Even though there’s an option to have no headers on your CSV file, my advice is, don’t tempt fate and just add the headers to the file. Your mapping source MUST match the header row in your CSV file.
-
Set up your node processor settings according to your requirements. It’s important to have a unique field in your CSV file to serve as the GUID because this indicates to the importer which nodes already exist in the database. Without a unique target as GUID, new nodes will be created even if you import the same file again.
-
As mentioned earlier, the source entered on the Node processor mapping must be an exact match with the headers on your CSV file.
-
If you have a multi-value field, you need to install the Feeds Tamper module. Enable BOTH Feeds Tamper and Feeds Tamper UI and you should see a Tamper tab on the top right corner.
-
At your multi-value field, click on ➕ Add plugin and choose Explode. This plugin simply splits out the individual values in that field according to their separator.
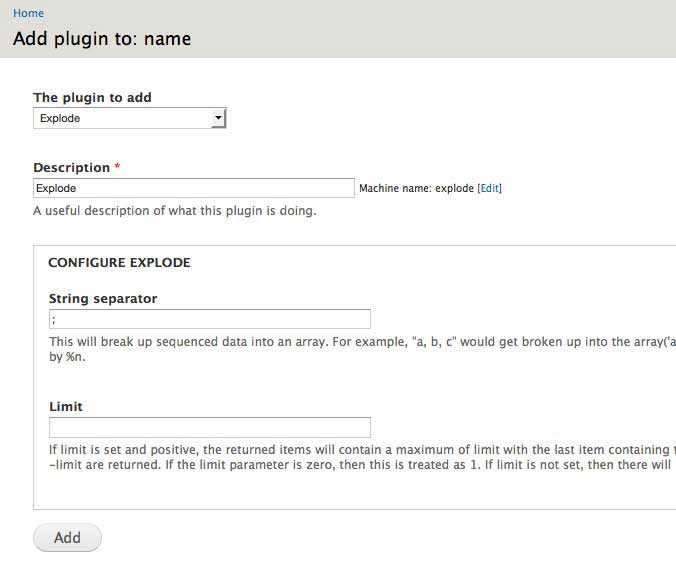
The String seperator is something you have to think about when formatting your CSV file. Each individual field has a separator, but for a multi-value field, each value also has a separator. I tend to use the default comma for each field, and a semi-colon for exploding.
Spaces in between individual values are also recognised. So if you don't want to prepend single spaces to your imported values, either remove them between individual values on your CSV file or use
%sin the string separator.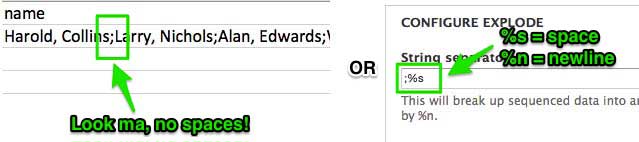
-
If you're importing a taxonomy term, you have the option of matching the term to a term name, term ID or GUID. Checking Auto create will create any terms that do not already match existing terms in your database. If you do not check this, and your CSV contains terms that do not exist in your database, those terms will not be imported.

-
If you need to import files or images, you have 2 options. Both of them require you to pick the Image: URI (field_image:uri) target when mapping.
If the files already exist somewhere on the web, check that the files are accessible. The field on your CSV file should contain the exact URL to the file you want imported, for example,
http://www.SITE_NAME.com/FILE_NAME.ext.Make sure there are no spaces anywhere in the URL in your CSV source file, especially at the very beginning of your file URL. See reference post.
The second option is to manually upload the files to the server. Make sure your files are in the correct folder. Then go to the Tamper section and add and Rewrite plugin to the file field. There are tokens available for use in the replacement pattern so in my example, the pattern would be
public://[image].
public://points to the sites/default/files folder. If you organise your images in that folder differently, adjust the replacement pattern accordingly. If you have an images folder in there, then usepublic://images/[image].One caveat with this method is that it results in duplicate images in your sites/default/files folder. Even though the images are already in the folder, Drupal will make a copy of the image so you end up with both
image1.jpgandimage1_0.jpg. Unfortunately, there is no clear solution for dealing with this issue yet, as of time of writing.You could try using the Media Feeds module as described in this thread but I could not get it to work properly for this. I got the Failed to get the file object error instead.
The issue is being worked on though, and you can follow the issue thread here. I’ll update this post as this issue progresses. If you are doing a one-off import, one possible way to handle the duplicates is to manually remove the original files. But if you’re doing constant importing, I can see how this is not a viable option. Watch this space.
XML import
You will need to install the Feeds XPath Parser module for this. If you go to the module page, you’ll see that further development is happening at Feeds extensible parsers. Unfortunately, I was unable to get that to work at all with my XML file.
-
Add your new importer and set up the basic settings as required.
-
Set up your fetcher settings. If you're creating an automated feed that pulls from a URL, then select HTTP fetcher. Only the development version has the option to automatically add scheme.
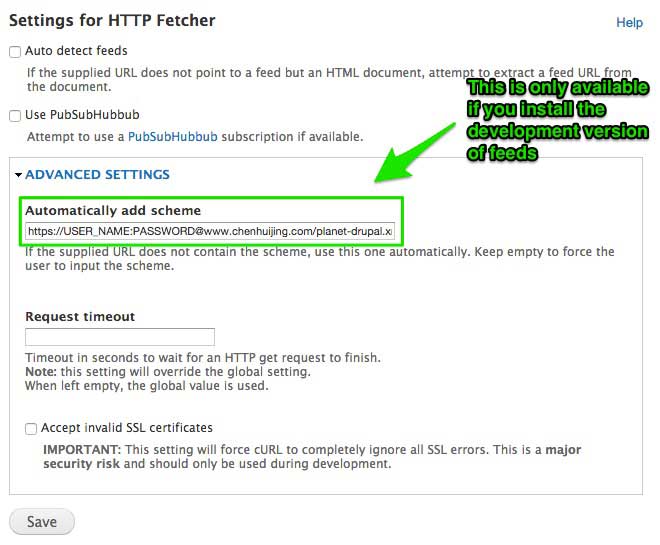
If your feed is password protected, you can append the login and password in front of the feed URL like in the example above. May be obvious to many, but took me a while to get wise to.
-
Set the parser to XPath XML parser but don’t do anything to its settings yet. Instead go straight to Mapping under the Processor option. Most of the time, importing content means creating nodes, hence Node processor is the default option.
-
Add as many XPath Expressions as required. Each XPath Expression maps a field on your XML document to a field on your content type.
-
Now you can input settings for the XPath XML parser. This is generally pretty straight-forward. Context is sort of like the parent level tag that wraps the rest of the data you want to import.
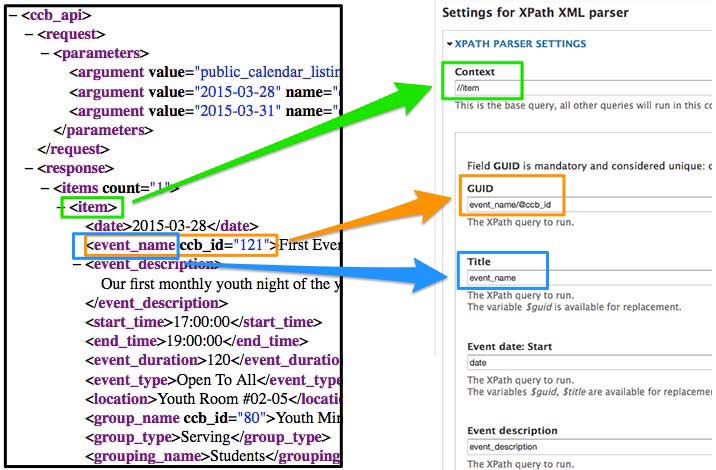
Each of the XML tags to map to their respective Drupal fields. If you have an XML attribute you want to use, the syntax is @attribute (refer to the orange arrow). This took me a LOT of googling to figure out.
-
If you read the CSV section, you’ll realise that importing files and images is a bit hairy. I’ve only ever imported images which are hosted somewhere on the internet when using XML importers. So if all the images you want to import are on your hard drive, maybe upload them somewhere first?
That aside, assuming your files already exist in a corner of the web, we’ll need the Media Feeds module. It’s dependent on the 7.x-2.x version of Media. Although it didn’t work properly for my CSV import, it worked fine for this.
You also need to enable the Media Internet Sources module that comes with Media. This will add an extra option of (media_internet) to your list of targets. As long as the URL in between your XML tags have no spaces in them, the import should take. Hopefully.
-
Once you’ve mapped everything out, it’s time to test your importer. Go to the import page and pick the importer you just created.
-
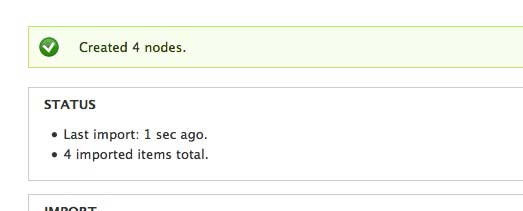
Enter the feed source URL and click import. Cross your fingers or whatever good luck ritual you have. If all went well, this is what you should see. Hopefully the correct number of nodes were imported.
JSON import
Similar to the XML option, you will need to install the Feeds JSONPath Parser module for this. If you go to the module page, you’ll see that further development is happening at Feeds extensible parsers. Full disclosure, I did not attempt to try the new module for JSON feeds.
-
Add your new importer and set up the basic settings as required.
-
Set up your fetcher settings. If you're creating an automated feed that pulls from a URL, then select HTTP fetcher. Only the development version has the option to automatically add scheme.
If your feed is password protected, you can append the login and password in front of the feed URL like in the example above.
-
Set the parser to JSONPath parser but don’t do anything to its settings yet. Instead go straight to Mapping under the Processor option. Most of the time, importing content means creating nodes, hence Node processor is the default option.
-
Add as many JSONPath Expressions as required. Each JSONPath Expression maps a field on your JSON document to a field on your content type.
-
Now you can input settings for the JSONPath parser. This is generally pretty straight-forward. Context is sort of like the parent level wrapper around the rest of the data you want to import. The syntax is
$.items.*. Each subsequent level of nesting should be separated by a period.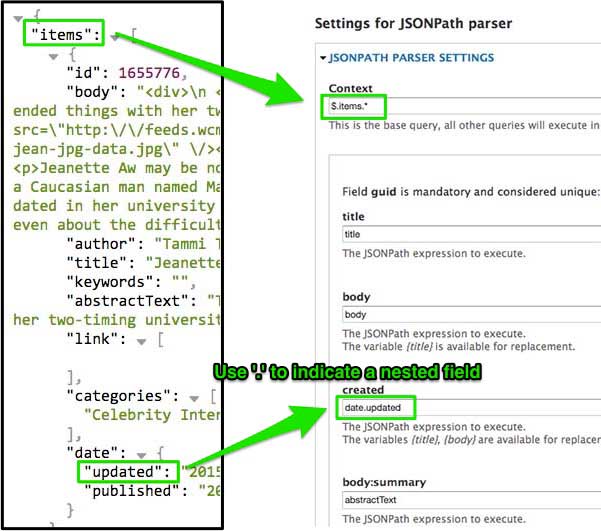
-
This particular step requires the Feeds Tamper module. If you have a required field on your content type which does not exist in your JSON document, you can use Blank source as the corresponding mapping.
My use case was for the language field of my imported nodes. The language field was a mandatory field, but it did not exist in the JSON document.

Click on the Tamper tab at the top right of the page. Then, add a plugin to the language field.
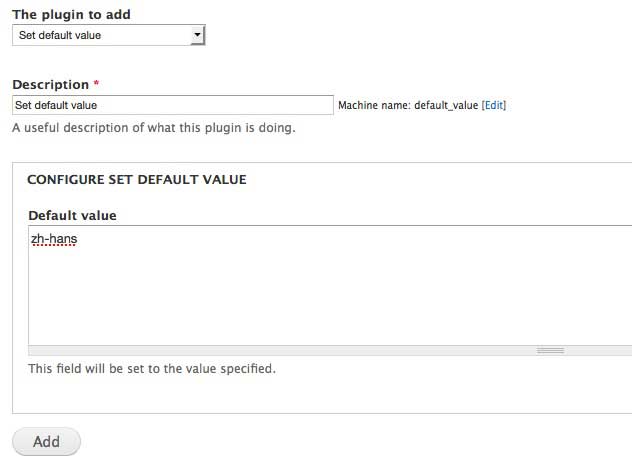
There are many plugins available to help you massage your data into its required format. For this particular use case, I’m using Set default value to input the language code zh-hans. As a result, all my imported nodes will have their language field set to zh-hans.
This is a very specific use case, but it just highlights how useful Feeds Tamper is in getting your import to work properly, given how finicky the importers are about formatting.
Non-format specific tips
-
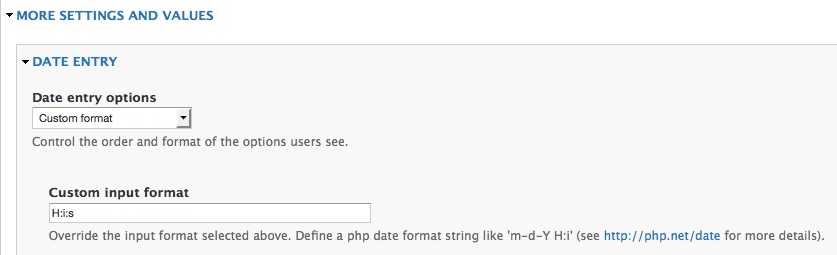
Dates and times
If you're importing dates, make sure the date format set on the field settings matches the format from your source. Same goes for time, which essentially uses the same field type anyway. Create a custom date format if you have to.
So that’s my 50 hours worth of feeds troubleshooting. However, I think my use cases for feeds will continue to increase so there is a high chance of a follow-up post, especially since the parser modules are being upgraded. Well, stay tuned then.
Credits: OG:image by Shannon