My past experience with exposing a project running on my local machine to a public URL was mostly to invoke the “phone-a-friend” option when I was troubleshooting stuff and needed help. In case you didn’t know, I used to build websites for a living. I still do that now, it’s just not the day job any more.
Another use-case was testing on Opera Mini. Browsersync is a key part of my web development process, especially when doing cross-browser testing. Unfortunately, it doesn’t run on Opera Mini, so using a public URL service was a viable workaround.
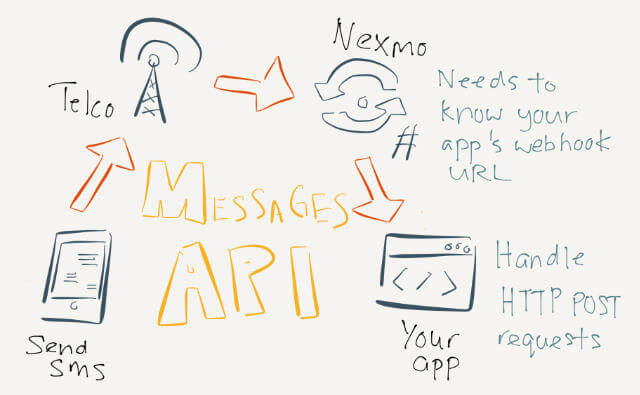
Developing with API platforms like Nexmo often means dealing with webhooks. Webhooks are used by lots of applications, like Github, Dropbox, Heroku and so on, and make it convenient for developers to integrate their own applications with these services. In a nutshell, they allow one application to inform another when something happens. To quote Jeff Lindsay:
Web hooks are essentially user defined callbacks made with HTTP POST. To support web hooks, you allow the user to specify a URL where your application will post to and on what events.
This means the application you’re building should have a route set up to handle incoming POST requests to the webhook URL. Here’s my crude attempt at illustrating how the Nexmo’s Messages API deals with inbound SMS to your application:
In order for Nexmo (or whichever service you’re trying to integrate) to make a successful HTTP request to your application, it has to be publicly accessible over the web. Most of the time, we access the internet through private IP networks by connecting to a nearby router.
Routers, for security purposes, generally don’t allow communication from devices outside the network without additional configuration. And you’d probably need a static IP address from your internet service provider as well.
If you happen to have some publicly accessible servers on hand, could be an AWS instance, DigitalOcean droplet, box under your desk, you could also try port forwarding using OpenSSH. Michael Blancard wrote a comprehensive blog post on how to set that up.
But if configuring servers really isn’t your thing, it’s probably time to consider some tunnelling services.
Tunnelling services
According to Wikipedia, a tunnelling protocol is a communications protocol that allows for the movement of data from one network to another. It involves allowing private network communications to be sent across a public network, such as the Internet, through a process called encapsulation.
For a detailed explanation of how tunnelling services work, I suggest this Stack Overflow answer by AJ ONeal. Exposing your local web server to the world via reverse proxy does have security implications, so if you’re doing this on your corporate network, it’s a good idea to inform your network/IT administrator beforehand.
You can always take precautionary measures like enforcing HTTPS, or using password protection, so perhaps this might factor into your choice of service, though as you’ll see, reverse proxy is not the only implementation available.
Free options
ngrok
ngrok is probably the go-to solution for this. Either that, or their SEO is on point. If you google “public localhost”, it comes out tops. Technically, it isn’t free, more like freemium, but the free tier costs zero dollars and is sufficient for most development purposes.
Let’s also answer the question of how to pronounce “ngrok” from the founder himself:
@Noamshemesh I pronounce it en-grok
— Alan Shreve (@inconshreveable) March 12, 2014
You’ll be asked to sign up for an account to get an authtoken for access to a bunch of nifty features. ngrok has a pretty good on-boarding documentation which covers most of the common questions and tasks you may want to achieve. There are installers for Windows, Mac and several Linux flavours.
For Unix-based systems like Mac/Linux, you can move the binary to a location on your $PATH so you can use the ngrok command anywhere, or add an alias to the binary for easier access.
Windows has a system PATH as well, though it’s a tad more complicated to add things to it. Thankfully, comprehensive instructions for this exists on the interwebs. To find out more about $PATH, this A List Apart article can help.
The authtoken is generated for your account automatically, so just copy the command in step 3, modify it depending on how ngrok is accessed via your command line and you should be good to go. Make sure your local web server is running, and take note of which port you’re using.
For example, if your application is running on port 3000, then use the following to start a HTTP tunnel:
ngrok http 3000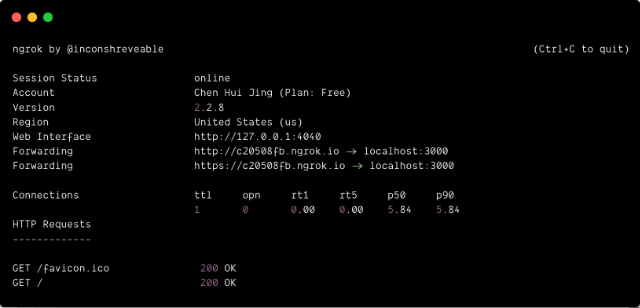
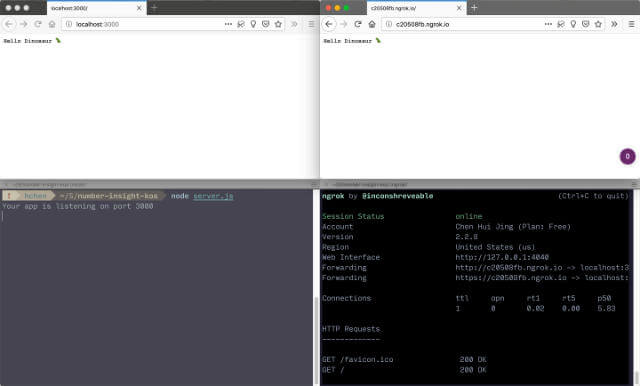
And if you log into your ngrok account, you can see the list of HTTP tunnels you have online at the moment.

Another useful feature ngrok provides is a way to inspect all requests your public URL received. If you look at the list of information logged in your console when you first run ngrok, you’ll see a URL for Web Interface, by default it is http://127.0.0.1:4040.
You can also replay a particular request. So if triggering a particular request in your application requires a series of steps, you can skip all that and just resend the request to your local server using ngrok.
ngrok is very feature-ful, so it’s a good idea to poke around the documentation to see what’s possible. ngrok’s paid features include use of custom/reserved domains (instead of having a random string every time you run it), reserving of TCP addresses and IP whitelisting, among others.
Serveo
Update (24 Jul 2020): seems like they have gone offline
Serveo (used to be at https://serveo.net/) is an alternative to ngrok. It even says so on its website. A key difference is there is no installation required. Serveo forwards all traffic that hits the unique URL it provides you to your localhost server via SSH.
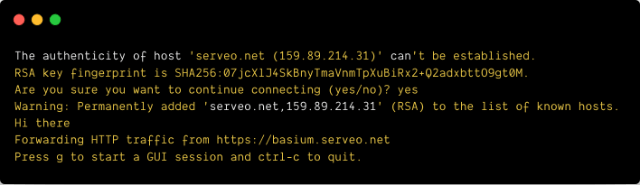
To get that public URL (adjust your port number and hostname accordingly), run the following:
ssh -R 80:localhost:3000 serveo.netYou will get a message about the RSA key fingerprint of the server asking if you’d like to continue connecting. Say yes and the server will be added to your list of known hosts.
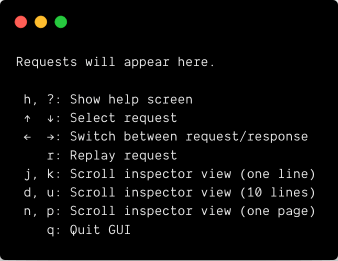
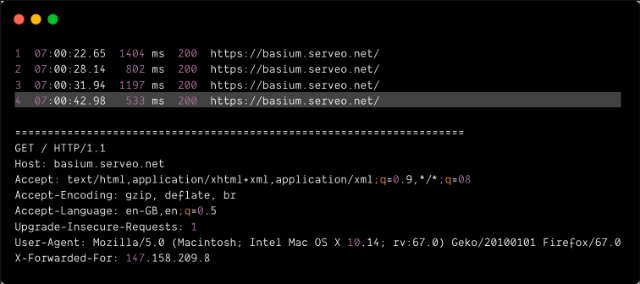
You’ll notice that there is an option to trigger a GUI. It’s not really a graphical user-interface as how we’d expect because this interface still runs on the command line, but there is the option to replay requests and inspect details of the request, just like ngrok.
It also preserves the allocated URL for free, so that might be something that’s appealing to some of you.
Localtunnel
Localtunnel is an open-source project that does exactly the same thing as the previous 2 services. You’ll need to have Node.js installed on your machine so you can install it via npm.
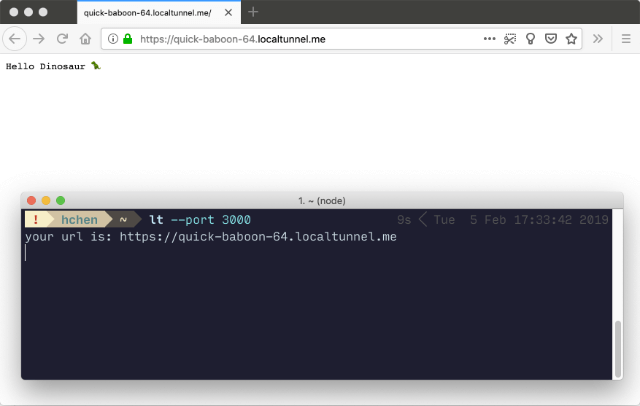
npm install -g localtunnelAfter which you will have access to the lt command and you can start your HTTP tunnel with the following (again, modify according to which port your application is running off):
lt --port 3000You will get a publicly accessible URL and for the most part, that would be enough for you to set up an integration with a service that supports webhooks.
What’s interesting about Localtunnel is that there is also a repository you can clone to set up your own localtunnel server, and hence use your own custom domain. This approach requires you have control of a server where you can set up DNS entries, as well as handle incoming TCP connections for any non-root TCP port.
localhost.run
localhost.run is very similar to Serveo but with less features. In fact, as far as I can tell, it only does 1 thing: expose your local web server to the web with a public URL. And it does that well enough for me.
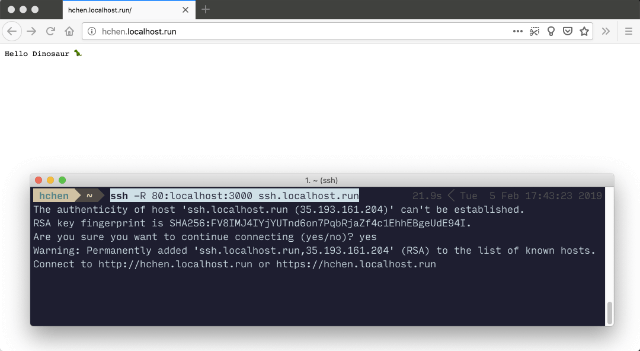
You’ll need to run the following (again, modify port number to suit your set up):
ssh -R 80:localhost:3000 ssh.localhost.runThere will be a message with the RSA key fingerprint of the localhost.run tunnel server when you connect for the first time, and you’ll need to agree to continue with the connection.
Telebit
Telebit is pretty interesting to me for a number of reasons. In addition to doing port forwarding, you can also share files over Telebit, configure it like a VPN, and the man behind the project, AJ ONeal, hosts it on his own git server (built on Gitea, a community fork of Gogs). And that’s kinda cool to me.
Because of the number of features it offers, the installer does a number of things, which are all listed on the documentation page:
- install Telebit Remote to ~/Applications/telebit/
- symlink the executable to ~/telebit for convenience
- create the appropriate system launcher file
- /etc/systemd/system/telebit.service
- ~/Library/LaunchAgents/cloud.telebit.remote.plist
- create local user config
- ~/.config/telebit/telebit.yml
- ~/.local/share/telebit
I ran into some permissions issues but could still run the executable so not too sure what happened there. When you run the telebit command for the first time, you’ll be asked to register with your email address.
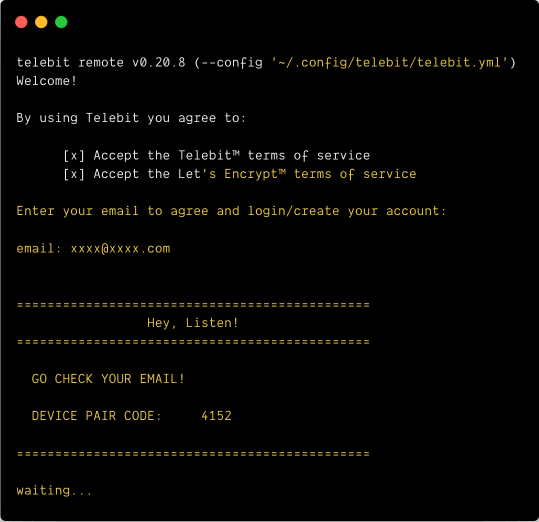
I got stuck after this because I never received the email, so this is sort of an incomplete run through of Telebit. 🤷
Paid options
There are also a number of paid options, like pagekite, Forward and Burrow.io. I did not try them out, because for me, the free options more than cover my needs. But I’m putting them up here anyway just in case they cover some of your use cases.
Wrapping up
I did not realise there were that many options for exposing your localhost to the web, but there you go. I suggest taking the time to check each of them out (at least visit their websites) and see which one fits your needs.